Import data
The Import Data page provides you with the capability to bring data from an external source into Intercompany Management.
To access the Data Entry Import page, click ![]() Import of Data > Import Data.
Import of Data > Import Data.

-
The files structure — the import file structure which determines the format and handling of the imported data.
-
The Mapping tables — for the data you want to import: Companies, Partners, Account numbers, and Negative account.
Import data from an external source
You typically do the following to do data import:
-
Create a source file —comma-separated values (CSV) or Excel spreadsheet (XLS or XLSX).
-
Create a mapping table or use an existing mapping table
-
Associate an import file structure with a mapping table
-
Upload the content from a source file
To import data:
-
In the File structure field, you can select a previously saved structure from drop-down.
Note: To define a new file structure, click Define file structuresto open the Import File Structures page and create another structure for your import.
-
Next, choose an option to specify how the imported data is handled during the import:
-
Replace all existing data: deletes ALL existing data of the imported company for the current period and replaces deleted data with the one contained in the file.
-
Replace imported accounts: deletes the data of only the imported accounts of the imported company for the current period and replaces it with the data contained in the file.
-
Add to existing: adds the imported data to the existing ones.
-
-
Optionally, if you wish to round the amounts imported from the file, select the Round amounts option.
-
Proceed to the mapping stage in the Mapping tables section.
-
In the field applicable to the data (Companies, Partners, Account numbers, and Negative account) you want to import, select a mapping table.
Note: To define new mappings, click Define company mappings to open the Import File Structures page.
-
To upload the file you want to import, click
 beside the File to import field to display your file explorer.
 -
Navigate to, and select the file you want to upload. The name of the selected file appears in the File to import text field.
-
In the Sheet field, enter the sheet name if more than one sheet is in the import file.
-
Optionally, select the rows of data you want to import from the file by specifying the From Row (first line) and To Row (last line).
-
Click
 to launch the validation of the data to be uploaded. Look for the result of the validation on the right side of the page.
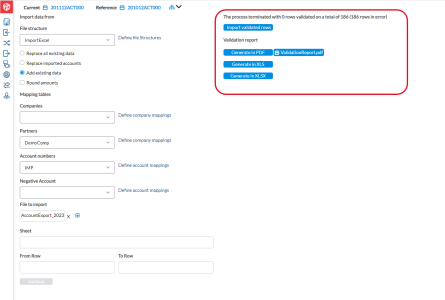
-
If there are no errors, click
 to finalize the import procedure.
 -
If the file contains errors, generate a validation report to obtain the details. Click on any the report formats (PDF, XLS, XLSX) available to generate the report and see the lines in error and the reason for the error.
-
